Deploy and Manage rekuiper with OpenYurt
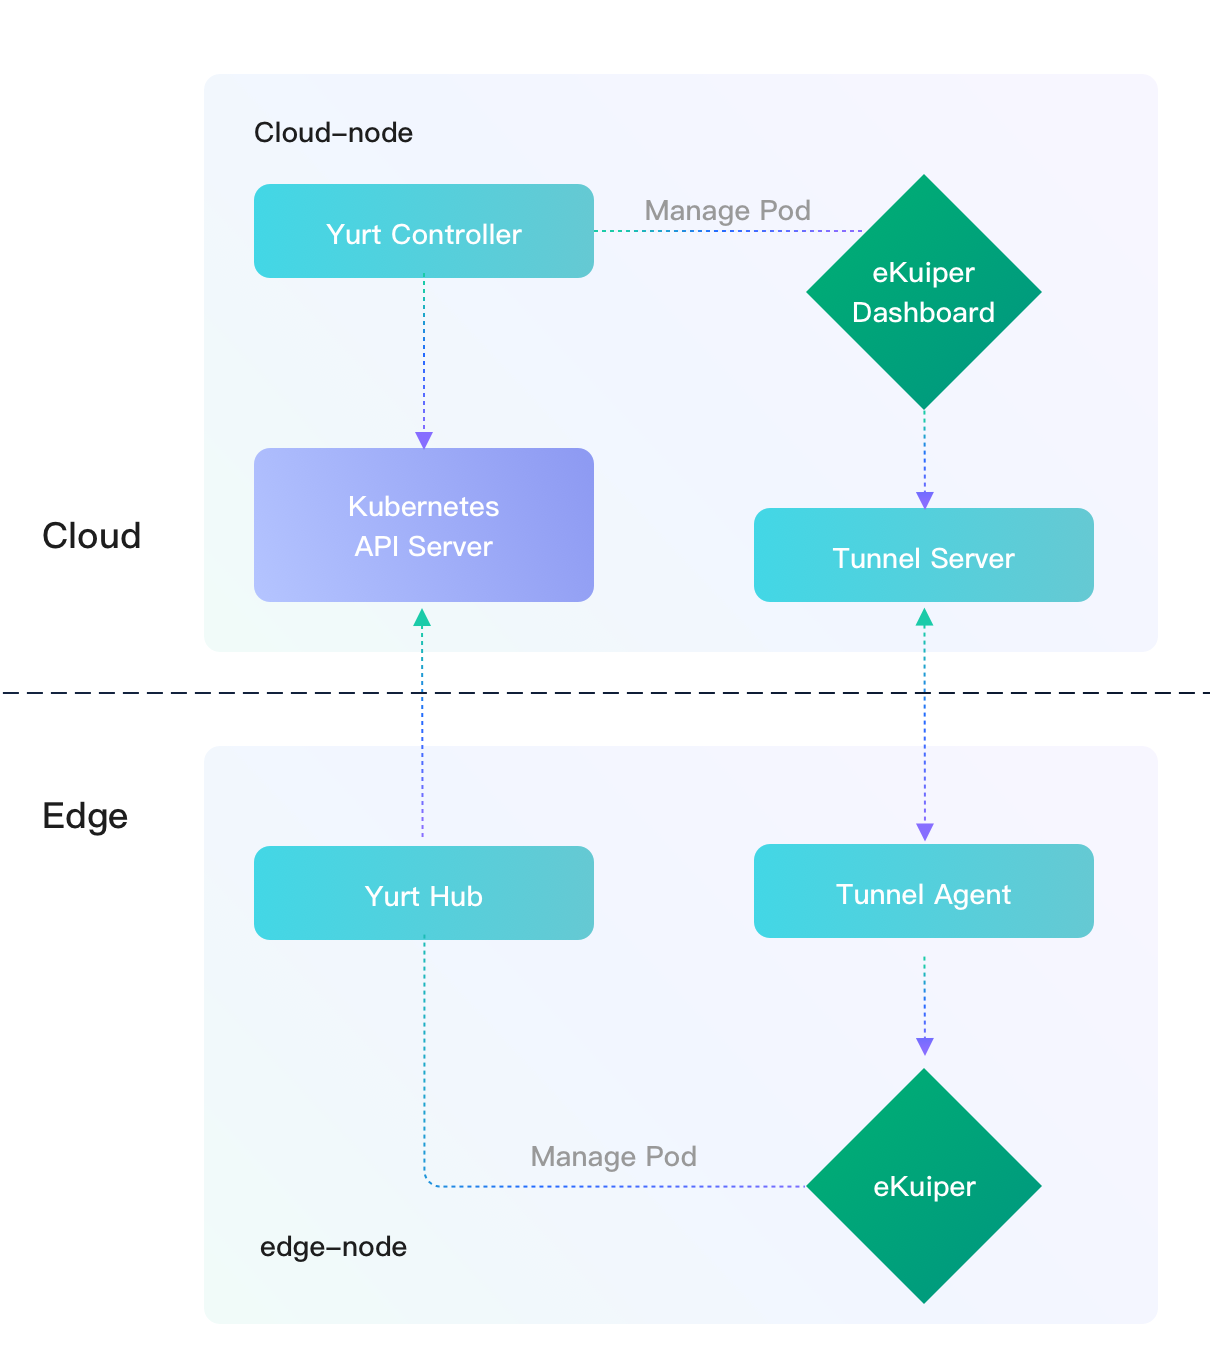
LF Edge rekuiper is lightweight IoT data analytics and streaming software that usually runs at the edge. A manager dashboard manages one or more rekuiper instances. The dashboard usually deploys on a cloud node to manage rekuiper instances across multiple edge nodes.
In many environments, the cloud node cannot access the edge node directly because of firewall or network security boundaries. This condition prevents direct cloud-to-edge management. OpenYurt resolves this problem. OpenYurt extends native Kubernetes to support edge computing architectures. OpenYurt enables users to manage edge applications as if they run in the cloud infrastructure.
In this tutorial, you deploy rekuiper and the web dashboard in an OpenYurt cluster. You configure a Yurt tunnel to manage the edge instance from the cloud. The tutorial uses a two-node Kubernetes cluster. The rekuiper instance runs on the edge node. The manager dashboard runs on the cloud node.
Prerequisites
Both the cloud node and the edge node require Kubernetes and its dependencies. The cloud node also requires OpenYurt and Helm to deploy rekuiper.
Ensure that the network configuration meets these requirements:
- The cloud node has an external IP address that the edge node can access.
- The edge node resides on an internal network that the cloud node cannot access directly.
Install Components on the Cloud Node
Install
kubeadmand a container runtime such as Docker Engine. Refer to the official kubeadm installation documentation for details.TIP
OpenYurt does not support Kubernetes versions greater than 1.20. Install version 1.20.x or earlier.
On Debian or Ubuntu systems, install the packages with this command:
shellsudo apt-get install -y kubelet=1.20.8-00 kubeadm=1.20.8-00 kubectl=1.20.8-00Install Helm to deploy rekuiper through Helm charts.
This tutorial uses the hostname cloud-node for the cloud host. If you use a different hostname, replace cloud-node in all commands.
Install Components on the Edge Node
Install kubeadm on the edge node.
This tutorial uses the hostname edge-node for the edge host. If you use a different hostname, replace edge-node in all commands.
Set Up the Kubernetes Cluster
Initialize the Kubernetes cluster with kubeadm and join the edge node to the cluster.
Assume the external IP address of the cloud node is 34.209.219.149. Run this command on the cloud node:
sudo kubeadm init --control-plane-endpoint 34.209.219.149 --kubernetes-version stable-1.20The output shows initialization details similar to this example:
[init] Using Kubernetes version: v1.20.8
...
Your Kubernetes control-plane has initialized successfully!

To start using your cluster, you need to run the following as a regular user:

  mkdir -p $HOME/.kube
  sudo cp -i /etc/kubernetes/admin.conf $HOME/.kube/config
  sudo chown $(id -u):$(id -g) $HOME/.kube/config

Alternatively, if you are the root user, you can run:

  export KUBECONFIG=/etc/kubernetes/admin.conf

You should now deploy a pod network to the cluster.
Run "kubectl apply -f [podnetwork].yaml" with one of the options listed at:
  https://kubernetes.io/docs/concepts/cluster-administration/addons/

You can now join any number of control-plane nodes by copying certificate authorities
and service account keys on each node and then running the following as root:

  kubeadm join 34.209.219.149:6443 --token i24p5i.nz1feykoggszwxpq \
    --discovery-token-ca-cert-hash sha256:3aacafdd44d1136808271ad4aafa34e5e9e3553f3b6f21f972d29b8093554325 \
    --control-plane

Then you can join any number of worker nodes by running the following on each as root:

kubeadm join 34.209.219.149:6443 --token i24p5i.nz1feykoggszwxpq \
    --discovery-token-ca-cert-hash sha256:3aacafdd44d1136808271ad4aafa34e5e9e3553f3b6f21f972d29b8093554325
The command sets the external IP address as the control plane endpoint so that the edge node can access it.
Configure kubeconfig according to the instructions in the command output. Copy the kubeadm join command for use on the edge node.
On the edge node, run the join command:
sudo kubeadm join 34.209.219.149:6443 --token i24p5i.nz1feykoggszwxpq \
    --discovery-token-ca-cert-hash sha256:3aacafdd44d1136808271ad4aafa34e5e9e3553f3b6f21f972d29b8093554325
Return to the cloud node and verify that both nodes appear in the cluster:
kubectl get nodes -o wideExample output:
NAME         STATUS     ROLES                  AGE   VERSION   INTERNAL-IP     EXTERNAL-IP   OS-IMAGE             KERNEL-VERSION     CONTAINER-RUNTIME
cloud-node   NotReady   control-plane,master   17m   v1.20.8   172.31.6.118    <none>        Ubuntu 20.04.2 LTS   5.4.0-1045-aws     docker://20.10.7
edge-node    NotReady   <none>                 17s   v1.20.8   192.168.2.143   <none>        Ubuntu 20.04.2 LTS   5.4.0-77-generic   docker://20.10.7
If the node status displays NotReady, install a Kubernetes network add-on as described in the Kubernetes add-on documentation. For example, install Weave Net:
kubectl apply -f "https://cloud.weave.works/k8s/net?k8s-version=$(kubectl version | base64 | tr -d '\n')"Wait several minutes and run kubectl get nodes -o wide. Both nodes should transition to the Ready status.
Configure Access to the Cloud Node
If the internal IP address of cloud-node is not accessible from the edge node, configure address forwarding. In many cloud environments such as AWS, the virtual machine does not assign the external IP directly to the network interface. You can add iptables rules to forward internal IP traffic to the external IP.
Assume the internal IP address of the cloud node is 172.31.0.236. Run this command on the cloud node:
sudo iptables -t nat -A OUTPUT -d 172.31.0.236 -j DNAT --to-destination 34.209.219.149Run this command on the edge node:
sudo iptables -t nat -A OUTPUT -d 172.31.0.236 -j DNAT --to-destination 34.209.219.149Verify that the edge node can reach the address:
ping 172.31.0.236Deploy rekuiper on the Edge Node
Use the rekuiper Helm chart to deploy rekuiper on the edge node.
Clone the repository and navigate to the chart directory:
shellgit clone https://github.com/ankur-paan/rekuiper.git cd rekuiper/deploy/chart/ekuiperModify
template/StatefulSet.yamlaround line 38 to addnodeNameandhostNetwork:yaml... spec: nodeName: edge-node hostNetwork: true volumes: {{- if not .Values.persistence.enabled }} ...Replace
edge-nodewith your actual edge node hostname if it differs.Deploy rekuiper with Helm:
shellhelm install ekuiper .Verify that the services run:
shellkubectl get servicesExample output:
shellNAME TYPE CLUSTER-IP EXTERNAL-IP PORT(S) AGE ekuiper ClusterIP 10.99.57.211 <none> 9081/TCP,20498/TCP 22h ekuiper-headless ClusterIP None <none> <none> 22hVerify that the pod runs on
edge-node:shellkubectl get pods -o wideExample output:
shellNAME READY STATUS RESTARTS AGE IP NODE NOMINATED NODE READINESS GATES ekuiper-0 1/1 Running 0 22h 10.244.1.3 edge-node <none> <none>The rekuiper REST service listens on port
9081. Test the connection from the edge node, where192.168.2.143is the edge node intranet IP address:shellcurl http://192.168.2.143:9081Example response:
json{"version":"1.2.0","os":"linux","upTimeSeconds":81317}
Deploy the Web Dashboard on the Cloud Node
Deploy the rekuiper dashboard on the cloud node by using kubectl with the kmanager.yaml manifest. The manifest defines a Deployment and a Service for the rekuiper manager web UI.
Verify that the container image tag in
kmanager.yamlmatches the rekuiper version:yaml... containers: - name: kmanager image: ankur-paan/ekuiper-manager:latest ...Apply the manifest:
shellkubectl apply -f kmanager.yamlCheck the service status:
shellkubectl get svcExample output:
shellNAME TYPE CLUSTER-IP EXTERNAL-IP PORT(S) AGE ekuiper ClusterIP 10.99.57.211 <none> 9081/TCP,20498/TCP 120m ekuiper-headless ClusterIP None <none> <none> 120m kmanager-http NodePort 10.99.154.153 <none> 9082:32555/TCP 15s kubernetes ClusterIP 10.96.0.1 <none> 443/TCP 33hThe dashboard service listens on NodePort
32555. Openhttp://34.209.219.149:32555in your browser. Log in with the default credentials:admin/public.Register the edge rekuiper service in the dashboard:
Click Add Service and complete the form.
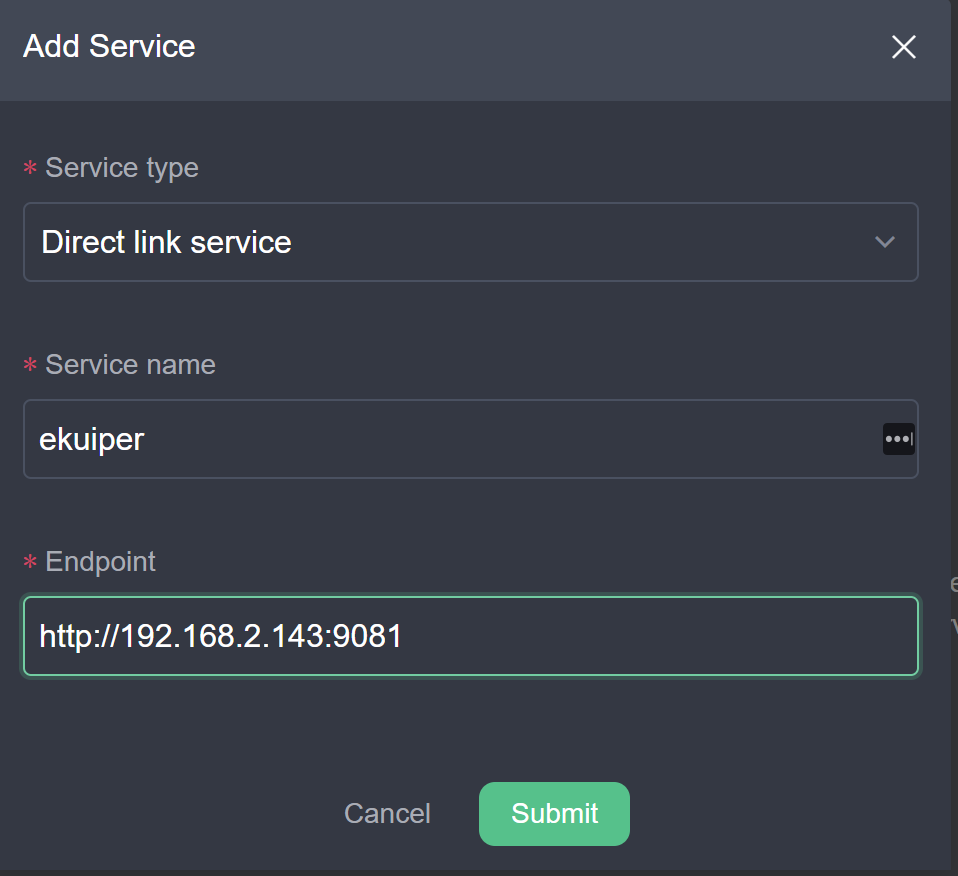
Click the service name
ekuiperand open the system tab.The connection fails and displays an error. The address
http://192.168.2.143:9081/is an internal edge address that the cloud node cannot access directly.
The next section configures a Yurt tunnel to enable cloud-to-edge management.
Set Up the Yurt Tunnel
OpenYurt provides a reverse tunnel for secure communication between the cloud and the edge node. Because the dashboard must reach port 9081 on the edge node, configure port forwarding in the Yurt tunnel.
On the cloud node, open
openyurt/config/setup/yurt-tunnel-server.yaml. Under ConfigMapyurt-tunnel-server-cfg, setdnat-ports-pair:yamlapiVersion: v1 kind: ConfigMap metadata: name: yurt-tunnel-server-cfg namespace: kube-system data: dnat-ports-pair: "9081=10264"If the cloud node does not have a public IP directly on its interface, add
--cert-ipswith the external IP address:yaml... args: - --bind-address=$(NODE_IP) - --insecure-bind-address=$(NODE_IP) - --proxy-strategy=destHost - --v=2 - --cert-ips=34.209.219.149 ...Convert the Kubernetes cluster to an OpenYurt cluster:
shell_output/bin/yurtctl convert --cloud-nodes cloud-node --provider kubeadmLabel the cloud node and deploy the tunnel server:
shellkubectl label nodes cloud-node openyurt.io/is-edge-worker=false kubectl apply -f config/setup/yurt-tunnel-server.yamlLabel the edge node and deploy the tunnel agent:
shellkubectl label nodes edge-node openyurt.io/is-edge-worker=true kubectl apply -f config/setup/yurt-tunnel-agent.yamlAfter the server and agent pods run, return to the web dashboard in your browser. Click the service name
ekuiperand open the system tab. The service status reports healthy: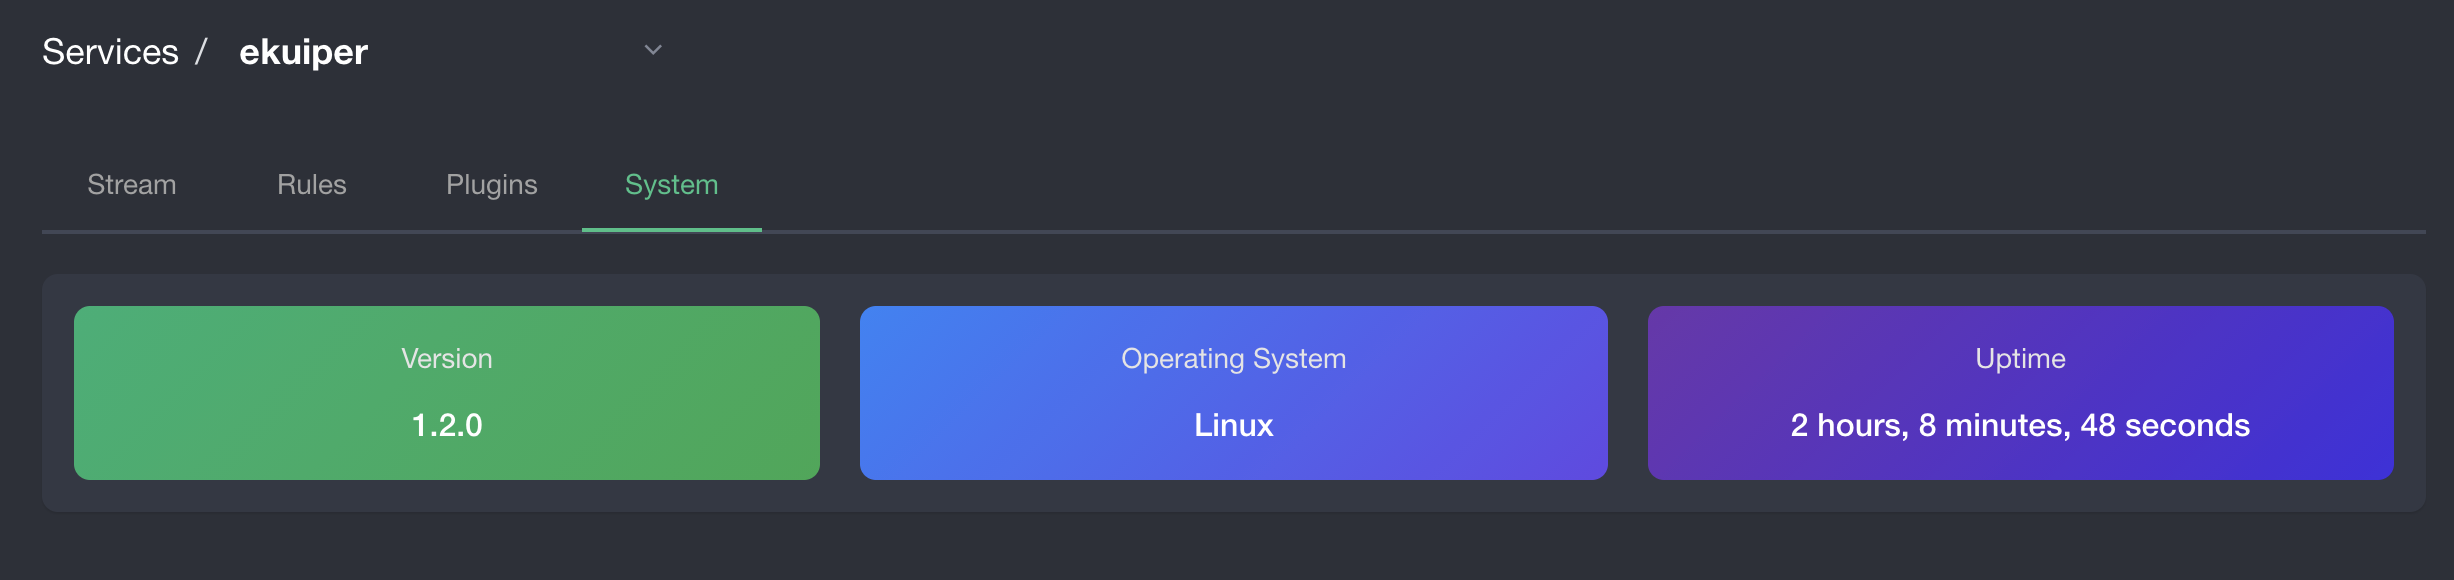
You can now manage the edge rekuiper instance from the cloud dashboard. Refer to the manager UI tutorial to manage streams, rules, and plugins.